
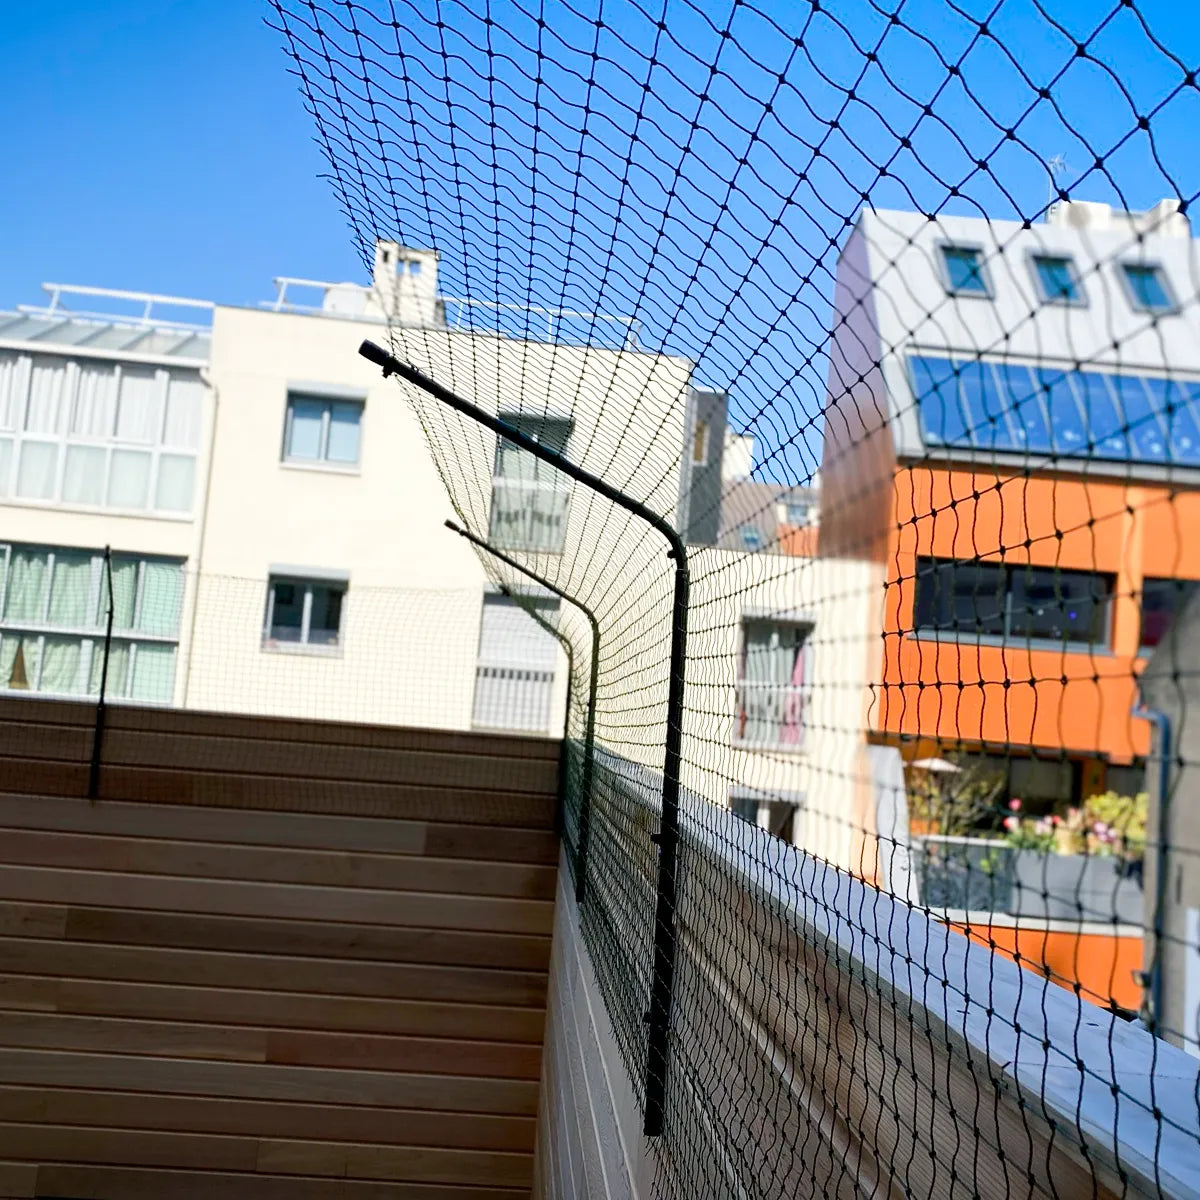
Has your cat developed a habit of climbing the garden fence, or would you simply like to allow it to enjoy the outdoors more safely? An escape-proof cat flap can complete an existing fence with an inward-sloping return, making it much harder for a cat to climb over.
It is entirely possible to make your own system, provided you carefully plan its design: the length of the return, the strength of the supports, the tension of the netting, the angles of the garden... It is often the small details that make all the difference.
Here is how to make an escape-proof cat flap step by step, choose the right materials, and avoid the main installation pitfalls.
Contents
- What is an escape-proof cat flap?
- Can you make an escape-proof cat flap yourself?
- What materials do you need to make a cat flap?
- What dimensions should you choose for an escape-proof cat flap?
- At what angle should you install a cat flap?
- How to make an escape-proof cat flap step by step?
- How to fix a cat flap according to the type of fence?
- What netting should you choose to make your cat flap?
- What mistakes should you avoid when making a cat flap?
- How to check that a cat flap is correctly installed?
- DIY cat flap or ready-to-install cat flap: which one should you choose?
- How much does a DIY escape-proof cat flap cost?
What is an escape-proof cat flap?
A cat flap is an extension added to the top of a wall, palisade, or fence. Unlike a simple vertical extension, it forms an inward-sloping return. When a cat reaches the top of the fence, it finds itself under this overhang and must overcome an additional obstacle to continue its ascent.
The principle is quite simple:
a sufficiently high fence + inward-sloping supports + correctly installed netting.
The cat flap thus secures an existing area without necessarily enclosing the entire garden.
If you would first like to compare the different possible configurations, our guide also explains how to secure a garden for a cat with netting and cat flaps.
Can you make an escape-proof cat flap yourself?
Yes, provided the existing fence is strong enough and you can correctly fix the various elements.
The principle of a cat flap is not technically very complex. What requires the most attention is ensuring a uniform installation along its entire length: properly aligned supports, sufficiently taut netting, and above all, no areas that the cat could use to get through.
A DIY installation can be particularly suitable if you have:
- a relatively simple fence
- a reasonable length to secure
- a solid support
- some basic DIY skills
- the necessary tools
For a long, irregular fence, or one made of several materials, using pre-sized cat flaps can considerably simplify installation. You can find various cat flap and post solutions.
What materials do you need to make a cat flap?
The materials depend partly on your fence, but you will generally need:
- inward-sloping metal supports or arms;
- durable outdoor netting;
- screws and wall plugs suitable for the support;
- durable clamps or fasteners;
- twine or cable for securing, depending on the configuration;
- tape measure;
- spirit level;
- drill driver;
- pliers or suitable cutting tool;
- stepladder if necessary.
Choosing the right fasteners is particularly important. A screw suitable for a wooden palisade will not necessarily work for a concrete wall, metal post, or rigid wire fence.
Before starting, identify exactly what your cat flaps will be attached to.
What dimensions should you choose for an escape-proof cat flap?
There is no universal size suitable for all gardens; it all depends on the size of your fence and the energy level of your cat. Above all, the return must be long enough so that your cat cannot easily reach its end when it reaches the top of the fence.
Felikit cat flaps prevent your cat from climbing over your fence.
Each cat flap consists of two parts: a vertical part, which is attached to your support (wall, palisade, fence, or custom Felikit frame), and an inward-sloping part. Installed at regular intervals, the cat flaps allow you to stretch a netting that your cat cannot climb over.
We recommend spacing the cat flaps 2 to 2.5 metres apart.
Several factors must be considered:
- the initial height of the fence
- the cat's physical abilities
- any nearby support points
- the length of the return
- the configuration of the angles
- the height your cat can already reach
A particularly agile, tall, or climbing-prone cat may require a more generous installation than a cat that is not inclined to climb.
To choose your dimensions more precisely, you can consult our guide for choosing the right cat flap size.
If the height of your fence, its configuration, or the desired dimensions do not match the standard models, a custom cat flap can be an interesting solution. It allows you to adapt the dimensions of the system to the particularities of your installation.
At what angle should you install a cat flap?
The cat flap must slope towards the inside of the property. The aim is that, when your cat reaches the top of the fence, it finds itself under an overhang that it cannot easily bypass or climb over.
It is best to avoid thinking solely in terms of a universal angle such as “it must be 45°”. The effectiveness of the system also depends on:
- the length of the arm;
- the height of the fence;
- the positioning of the netting;
- the support options available around it.
What matters most is ensuring a pronounced return towards the inside to break the cat's natural climbing path.
How to make an escape-proof cat flap step by step?
1. Measure the entire area to be secured
Start by precisely measuring the length of the fence on which you want to install the cat flaps.
Do not look only at the total length. Also identify:
- angles
- gates
- changes in height
- junctions between two types of fencing
- existing posts
- nearby trees
- sheds or cabins
- nearby furniture
These elements can change the way your cat uses the fence. A bench placed right next to it, a small wall, or a tree can, for example, provide an excellent starting point and greatly reduce the height it still has to overcome.
For larger installations, you can also use our guide for measuring the area to be fenced.
2. Check the strength of the fence
Before adding anything, check that the existing support is capable of accommodating the system.
A fence that moves significantly, a damaged palisade, or a poorly fixed post can weaken the entire installation.
In particular, check:
- the stability of the posts
- the condition of the wood
- the tension of the wire mesh
- the strength of the top of the fence
- the condition of the existing fasteners
Correct any such defects before starting to install the cat flaps.
3. Position the supports
Next, place the supports at the top of the fence, all facing the same direction: towards the inside of the garden.
Before fixing them permanently, align them visually. On a long fence, a support installed slightly higher or lower than the others can make it difficult to tension the netting.
The spacing between two supports must also remain small enough to prevent the netting from forming large pockets.
On Felikit cat flaps, a spacing of around 2 to 2.5 metres generally maintains good netting tension.
4. Securely fix the cat flaps
The fixing method depends directly on the support.
On a wooden palisade
Use screws that are long enough and suitable for wood. The cat flap must be fixed to a strong structural part, not simply to a thin decorative slat.
On a wall
Use wall plugs and screws suitable for the type of wall: concrete, cinder block, stone...
On a metal fence
Depending on the model, the cat flap can be fixed to the existing posts or with a fastening system suitable for the structure.
On rigid wire mesh
The posts are generally the best points of attachment for properly supporting the structure.
If you need to complete your installation, Felikit also offers various items in the screws and fasteners collection.
5. Install the protective netting
Once all the supports are in place, you can install the netting. Unroll it gradually rather than trying to position the entire length at once. First fix it at a few key points, then gradually tension it.
The netting must be:
- sufficiently taut
- uniform
- correctly fixed at the ends
- continuous across the entire area
- without large pockets between two supports
It must also not create large gaps at the junction with the fence. Choose a material designed to stay outdoors and withstand UV rays, the elements, and the demands of a cat. You can, in particular, use a protective netting for cats designed for this type of installation.
6. Secure the angles and ends
An installation can be perfectly completed over ten metres... and become ineffective because of a gap left in a corner.
Inspect particularly:
- the corners of the garden
- the wall/fence junctions
- the gates
- the changes in height
- the ends of the netting
- the posts
- the downpipes
- nearby trees or structures
In a corner, ensure that the netting remains truly continuous so that the cat does not find an area to climb or gain a foothold. The same logic applies to a gate: the system must continue to do its job when it is closed.
7. Go around the garden... like your cat
Once the installation is complete, take a few minutes to look at your fence differently. Ask yourself one question: “If I were my cat, where would I try to get through?”
Look particularly to see if it could climb onto a bin, climb up a shed, use a branch, gain a foothold on a post, reach the end of a cat flap, pass between the netting and the fence, exploit a corner, or climb over the gate. It is often at this stage that the last flaws are spotted.
How to fix a cat flap according to the type of fence?
The existing structure will determine much of the installation.
| Type of support | Points to consider |
|---|---|
| Wooden palisade | Fix to a sufficiently thick structural part |
| Concrete or cinder block wall | Use wall plugs and screws suitable for the material |
| Stone wall | Adapt the fasteners to the masonry |
| Rigid wire mesh | Ideally use the posts as fixing points |
| Metal posts | Use a fastener suitable for their section and material |
| Gate | Maintain the opening while ensuring the continuity of the system |
In all cases, the strength of the system depends as much on the cat flap as on the support it is installed on.
What netting should you choose to make your cat flap?
The netting makes up the second essential part of the system. Choose netting that is:
- suitable for outdoor use;
- resistant to UV rays and the elements;
- strong enough to withstand the cat's demands (with steel wire);
- suitable for the dimensions of your installation;
- easy to tension correctly.
The quality of the netting matters, but so does its installation. Even excellent netting loses much of its usefulness if it sags between two cat flaps or leaves gaps at the ends. It is therefore preferable to buy enough length to cover the entire area while leaving a margin for fasteners and angles.
What mistakes should you avoid when making a cat flap?
A cat flap may seem correctly installed while still leaving some particularly attractive opportunities for a determined cat.
Here are the most common mistakes to avoid:
- choosing a return that is too short
- installing the supports almost vertically
- spacing the cat flaps too far apart
- leaving the netting slack
- forgetting a corner
- creating a gap between the fence and the netting
- using unsuitable fasteners
- installing the system on a flimsy fence
- leaving a tree, piece of furniture, or shed that can serve as a springboard
- securing the fence but forgetting the gate
- assuming that your cat will never try to climb because it has not done so yet
This last mistake is particularly common. The purpose of an escape-proof system is precisely not to wait and see if your cat will manage to climb over the fence.
How to check that a cat flap is correctly installed?
Before letting your cat enjoy the garden, do one final inspection. We invite you to check the following:
- that all the cat flaps are securely fixed
- that no support is moving
- that the net is properly tensioned
- that no gaps remain in the corners
- that the ends are properly closed
- that the gate is secured
- that no object allows the system to be bypassed
- that no sharp or dangerous fasteners protrude
You can then discreetly observe your cat during its initial explorations. There is no need to deliberately place it in front of the fence to “test” the system: simply watch how it naturally uses its environment.
Homemade cat flap or ready-to-install cat flap: which one to choose?
Making your own installation can be interesting if the terrain is simple and if you already have the necessary tools and materials.
DIY allows you to precisely adapt the installation to the layout of your garden, work with an existing fence, and meet specific requirements. It is a good option if you are comfortable with DIY and if your garden does not present too many difficulties.
A ready-to-install system, on the other hand, offers greater consistency in dimensions and simplifies installation when several meters of fencing need to be equipped. It can be particularly interesting over a long stretch if you want a uniform appearance, if you do not want to make the metal arms yourself, or if the aesthetics of the final result are important.
Felikit also offers a custom-made cat escape-proof flap for configurations that require specific dimensions.
How much does a homemade escape-proof cat flap cost?
The budget depends mainly on the length of the area to be secured and the materials chosen. You must take into account the cost of the arms or supports, the net, the screws and fasteners, to which additional posts may be added if the layout of the garden requires it.
Also think about the tools needed for installation. If you are already equipped, the cost will remain limited; otherwise, purchasing or renting the equipment can represent a significant part of the total budget.
For a few meters of fencing and with materials already available, making your own installation can be economically interesting.
Over a long stretch, however, it is useful to compare the overall cost of the DIY project with that of a system already designed for this purpose: the multiplication of supports, fasteners, net and installation time can quickly represent a significant part of the budget.


